Servlet Hands On
The servlet can be created using
- Implementing Servlet Interface
- extending GenericServlet class or
- extending HttpServlet
We mostly used HttpServlet class, it provides http request specific methods
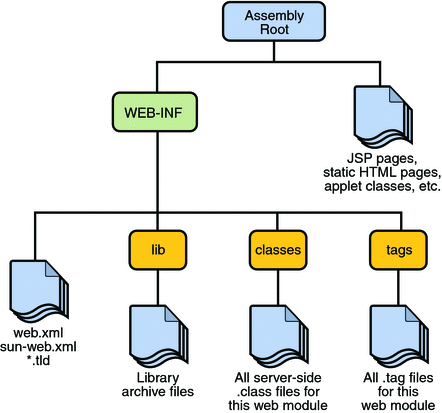
Directory Structure
Defines where need to put different types of file so that web container get information.

Ref: https://www.cis.upenn.edu/~matuszek/cit597-2006/Pages/file_structures.html
The Below Example based on creating servlet without any IDE Refer Project Folder
Servlet Creation
Example Code Here Hello.java
Compiling & Deploying
To compile servlet different server provide different jar files
- Apache Tomcat - servlet-api.jar
- weblogic - weblogic.jar
- Glassfish - javaee.jar
Compile & load class path
- To load the jar file set as class path or paste the jar file in JRE/lib/ext folder
- Compile the Hello.java file under folder /training/J2EE/hands-on/0-no-ide-servlet/servlet-src/Hello.java
- Copy the Hello.class file to folder /training/J2EE/hands-on/0-no-ide-servlet/WEB-INF/classes
Create Deployment Descriptor
- Deployment Descriptor is an xml file, web container get information about the servlet to be invoked
- it named web.xml
More Detalis on Deployment Descriptor
Deploying
- Start the downloaded tomcat server in command line
- to change the port number, in apache folder conf/server.xml, Change the Connector port = 8080 and replace 8080 by any four digit number instead of 8080
- copy the project folder to tomcat web apps directory
-
start the tomcat and access the url in browser http://localhost:8080/0-no-ide-servlet/hello
- Other ways of deploying
- create war file and paste it into web app directory
To create war file run command in project folder
jar cvf warproject.war *
Here, -c is used to create file, -v to generate the verbose output and -if to specify the arhive file name.The * (asterisk) symbol signifies that all the files of this directory (including sub directory).
- Run the tomcat server and access http://localhost:8080/warproject/hello (warproject is created war file name).
- create war file and paste it into web app directory
To create war file run command in project folder
You can use eclipse or any other IDE to do above things easily, you can refer Basic Servlet Project in folder using eclipse IDE
Eclipse Sample Servlet Project
How Servlet Works
As we studied in Servlet Life Cycle if the server requested first time web container load the servlet class, instantiate it, call the init method, other wise call the service method directly. The web container call the destroy method when it need to remove the servlet (time of stopping server, undeploy project)
WebContainer Handling Request
- maps the request with the servlet in the web.xml file.
- creates request and response objects for this request
- calls the service method on the thread
- The public service method internally calls the protected service method
- The protected service method calls the doGet method depending on the type of request.
- The doGet method generates the response and it is passed to the client.
- After sending the response, the web container deletes the request and response objects. The thread is contained in the thread pool or deleted depends on the server implementation.
Ref: Src code of HttpServlet.java
Tips - to extract war file use
jar -xvf warproject.war